Happy Monday!

I meant to post at least once during the past week, but I have been all a-buzz planning my annual Ladies' Tea. I plan events for other people year-round, but the tea party is actually mine, and is therefore an enormous affair. It will never be said of me that I do things half-way, and my tea party is no exception (in fact, it's the rule!) There are always decadent desserts, dainty cups, and beautiful centerpieces, along with an actual 'shopping spree' afterwards.
In the midst of all of my planning and calling and mailing and organizing, I thought I'd take a moment to share one of my favorite parts of the tea party: my tickets! I love working with my hands, and when I have an idea I always dive into it immediately, which means that my events are often speckled with things I have made myself. (And occasionally, my wonderful husband will contribute something spectacular, like a home-made rotating barber shop pole.)
 My tickets are always made by me, although sometimes I recruit an unsuspecting friend to help. {They don't realize that I produce hundreds!} They're inexpensive and adorable, so please, feel free to take the idea and run with it!
What you will need:
- Cardstock to match your theme
- Cardstock in a plain color and access to a printer
- Scissors / Paper slicer (I used both)
- Thin ribbon
- Double-sided tape
- Small hole punch
The design itself rarely changes, but the tickets always match the theme of the tea party. This year's theme is Shabby Chic (one of my favorites!) so I found some lovely designer cardstock. What I adored about this paper is that it is two-sided, but the designs are not the same on the front and back. So it's extremely mis-matched, and absolutely perfect.
 | ||
Sold at A.C. Moore. Isn't it stunning??
|


Once you have the information on a size you like, you can measure your theme cardstock to be a half-inch wider and a full inch longer. My rectangles wound up approximately 2.5 by 1.75 inches. (I say approximately because all of them were slightly different. I am unfortunately not into exact measuring.)
Next, snip the corners off of one side of the rectangle. If you truly want it to look like a teabag, you could certainly fold and staple the corners, but I wouldn't recommend it. Who has that kind of time??
 |
| As you can see, they're slightly different sizes. |
After this, use your hole punch at the top of your teabag. You can see that my hole punch is actually two holes close together, but if you only have one, that's perfectly fine. Be sure to punch your hole close to the edge, but not so close that the paper will rip (something like 1/8" is perfect).

Now you are ready for your ribbon! I selected pastel colors, and cut them approximately 12" long. Thread your ribbon through the hole(s) you have punched out. (If you only have one, I would suggest tying a knot after threading it so that it won't slide easily.) Then, tie a bow with the ribbon ends.
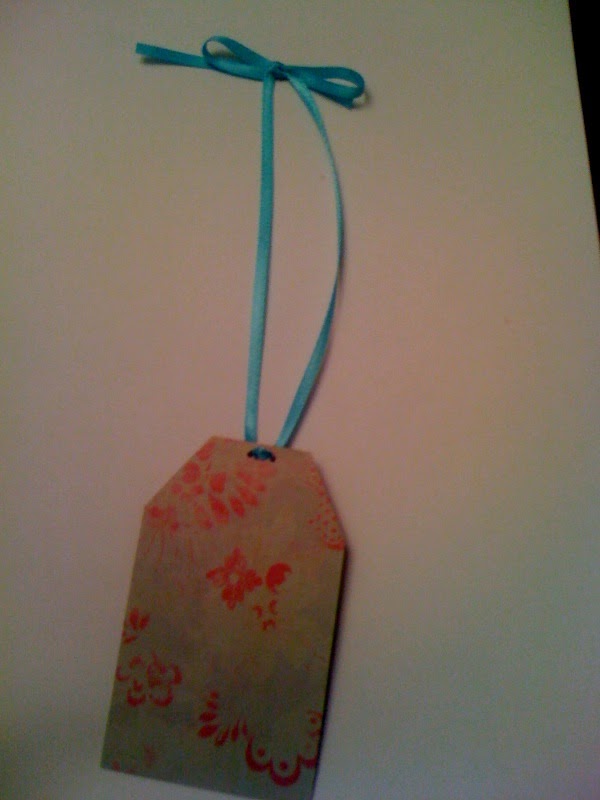
Finally, using the double-sided tape, add the tea information printed on the plain cardstock. I wouldn't use glue because it tends to make the paper 'bubble' a little, and I'm something of a perfectionist.
And that is it! You are finished! These are so charming, and a nice little keepsake from the tea (since I don't actually collect them back). I made approximately 200 in a day and a half, so they don't take a great deal of time.

 |
| I love to display things once I'm done with them so that I can enjoy the finished product. In this case, I hung the tickets up on a craft rack that my wonderful husband made for me. |
If you have any questions or suggestions, please leave a comment!
Happy Monday!
~ Sarah
 |
| A picture of last year's tea ticket. The theme was purple/green painted daisies. |
No comments:
Post a Comment