Showing posts with label Entertaining. Show all posts

July 12, 2011

Pink and Green Birthday Party

Bonjour!  (I was reading a favorite blog today... she lives in Paris and it made me want to move there, too... I guess I'm feeling French now.)

Anyways.  As you may know from last week's posts {Sneak Peak and Homemade Confetti}, I helped at a birthday party this past weekend.  Not just any birthday party - Hot Pink and Lime Green!  The party was an enormous success.  The girls came in their lovely party dresses, and I enjoyed watching eyes widen and jaws drop when they saw it... The Holy Grail (a/k/a the Candy Bar.)  Here are some photos:


The birthday girls' names started with "S" and "B".  I was very fortunate to stumble on the adorable glasses at The Christmas Tree Shoppes for something like $2.99 each, so I gave them to the girls when the party was over. 


Overall, the candy bar was popular, but it paled compared to the other events at the party.  For a craft, the girls got to pick flipflops, and flowers/stones/decorations.  Then (with the help of an adult) they hot-glued the embellishments to the tops of the flipflops. 

We also set up a photo area for the girls.  I brought fuzzy hats, crazy sunglasses, boas and leis, and they got to dress up and pose with their friends.  I've never been to a party before where the candy was ignored in favor of the fun activities.  :)

Also, here's a picture of the centerpieces: 


I tied lime green tulle around glass vases, filled them with pink gel beads and l.e.d. tea lights to make them glow.  {The girls there told me that these gel beads are called "Orbies".  Can anyone confirm that?  They were given to me by a client, so I'm not familiar with their title or where to find them.  To be quite honest, sticking your hand in the bucket of these beads feels exactly the way I imagine a bucket of eyeballs would feel.}

And finally, the "Happy Birthday" party banners (you may recall the photo of letter "B" on the Sneak Peak post... here's the whole thing)


So, all in all, a successful, colorful party.  On to the next!!

~ Sarah

**  Thanks to Photography by Amber for allowing me to use some of her snapshots.

July 7, 2011

Pink and Green Birthday Party (Sneak Peak)

Hey!  It's Thursday - can you believe it??

I'm helping at a birthday party this weekend, and thought I'd share a sneak peak at what it will look like.  It's for two sisters, so rather than have them disagree over a theme, I asked their favorite colors and focused on them.  Here are some of the things I made for the party:

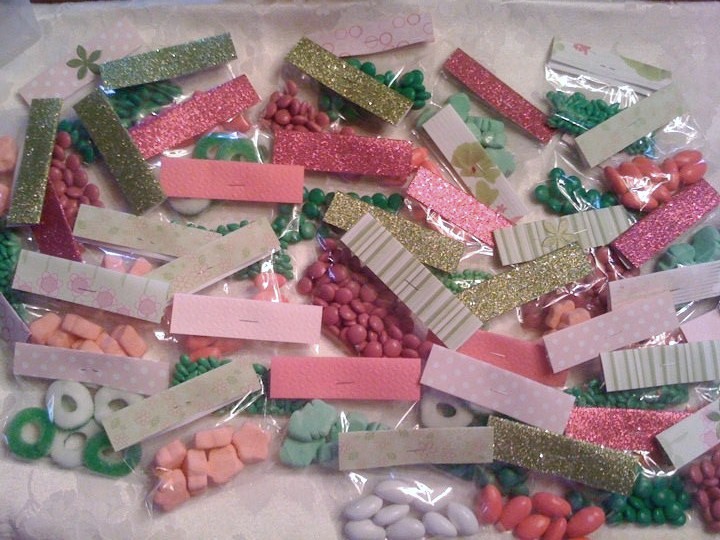
Candy Bags.  (These have appeared on my blog before - here, and here.)  It was a little more difficult than I expected to find bright green candy, so I snatched up large quantities of the candies I did find.  The result?  Possibly my favorite candy bags yet:

Marshmallows, Jordan Almonds, M & M's,
Runts, candy seeds, and Sour Patch rings.

I also made a lovely banner for them (see banner post here), and I took a photograph of one of the letters:


And finally, I made labels for the food table using cardstock and paper flowers:


It should be a wonderful, colorful party!  I hope to have pictures afterwards.  :)

~ Sarah

July 6, 2011

Orange Creamsicle Fruit Dip

Hey, everyone!  Happy 4th, no,  5th, wait, 6th of July!  It was a fast weekend, although it seems I'm still stuck in it.

I really ought to coordinate these posts better... for instance, had I posted this last week, you could've made it for last weekend, like I did.  We'll get there.  But perhaps you have a family reunion coming up, or are just planning an evening on the porch with some fresh fruit, and this will become your best friend. 

What you will need:
  1. Cool whip
  2. Orange cream yogurt (Yoplait is my favorite, but to each their own.)
  3. Food coloring (optional)
  4. Fruit for dipping (also optional... there are those who prefer to eat this with a spoon)
Mix the cool whip and the yogurt together.  I always add food coloring to make it more... peachy.

Remember, if you're adding food coloring,
use three or more parts yellow to one part red


Serve.

It's one of my favorite recipes.  I do love something complicated, but I'm not above enjoying something simple, if delicious, and this totally is.  :)

Additional Suggestions:
  • If you're not into creamsicle (I've heard there are people like that out there) then try one of the other flavored yogurts: blueberry, strawberry, etc.  {Thanks to Amy and Elizabeth for this suggestion.}
  • If you're looking for something with more ingredients, try adding cream cheese, powdered sugar, concentrated orange juice, and vanilla (these are the ingredients in another fruit dip recipe I have, but I rarely use it and don't know the measurements.)
  • As for the fruit, I always put the normal stuff: cantaloupe, strawberry, grapes (red and green) and pineapple.  I also add blackberries because they're visually appealing, and no one ever thinks of them, poor things.
~ Sarah

June 30, 2011

Flowering Tea

How on earth did it get to be Thursday??  Gosh, summer is flying by.  July is already here, depending on where you're reading my blog from.  {According to my stats, it seems I have a small audience in the middle east, and someone in Germany.}  Well, wherever you are reading from, I am very sorry that I've ignored you lovely readers this past week.  It's not intentional... it's just a survival thing.  I need to recoup, and locate important things in my house (like laundry, the dining room table, and a futon) that have been burried under mountains of centerpieces, teacups, tablecloths, and other event-planning stuff.

Well, last night, I did think about all of you.  <3 I actually made this tea just to show you, since I wasn't really in the mood for tea, and had other important things to do that I chose to put off. 

Have you ever heard of flowering teas?  They seem to be perceived as something from Sci Fi where I live... no one sells them, no one has heard of them.  Well, *I* know what they are (thanks to Marie Antoinette), so I searched high and low until I found a couple of boxes.  I had a mind to use them as centerpieces for my ladies' tea this past weekend, and what a centerpiece they turned out to be!  (Unfortunately, no one knew what they were, so no one realized how awesome they were.)

I found them at a flea market, of sorts, at a booth run by a woman who has eclectic taste, like me.  She sold lovely coffees, delightful mixes, and... yes... these flowering teas.  She saved me from ordering them online, which I was about to do in despair.  Here they are:


Now, there's not much to a flowering tea - hot water, and a glass cup.  The timer isn't even necessary, as the tea is considered ready when the flower's open.  I used one to show you how amazingly fast they open.  Have a look:


After our tea was over last weekend, my wonderful associate and I took turns trying them... yes, we sampled the teas right from the glass vases, singing the whole time: "Take one down, pass it around."  I'm rather disappointed to discover that I'm not a fan of Jasmine.  I wish I was!  It sounds so exotic and lovely, but it seems that it's just not my cup of tea {pun absolutely intended.}

Since it was nearly impossible for me to find these teas, I thought I'd give you some links to find them online.  Teavana, The Tea Smith, Google.  Please let me know what teas you have tried, and which ones you like the most.  It seems that I like teas with more of a tang, but I'm always willing to try something new. 


~ Sarah

June 27, 2011

Candy Bar

Whew!  Several days without a boo or a bah from your Blogger... it's madness at LwYH, let me tell you.  I'll show you why today. 

As mentioned in my posts over the past few weeks, I did a candy display at an event this weekend, and prepped for it for months.  I knew I wanted to do pink and gold, so every time I spotted something in that color range, I snatched it up.  I also made a few things of my own.

Here is the finished product:


From left to right, starting in the back first:
  1. Mini-cupcakes (baked by my mother-in-law) with buttercream or strawberry frosting.  (I melted the frosting so that it poured smoothly, filled the cupcakes to the top of the paper, then placed dainty little flowers made by a friend of mine in the center).
  2. Marble bark.  (I crunched graham crackers into crumbs and filled the bottom of a brownie pan.  I melted white chocolate in two different sauce pans and added a drop of red food coloring to one.  Then, I placed dabs of the chocolate over the crackers, alternating colors.  I took a pickle fork and mixed the colors together.  Once it hardened, I used a paintbrush and spread edible gold glitter over the whole thing.  I heated it for a few minutes again before cutting.)
  3. Cherry-flavored candy sticks.
  4. Marble bark.  I made two separate batches, and they came out looking so differently that I just separated them on the table.
  5. Butterscotch candies.
  6. Gold-wrapped Hershey Kisses.
  7. Light pink gumballs.
  8. Mini chocolate bars (see previous post: Pretty Little Candy Bars)
  9. Candy bags with Jordan Almonds in pink and white, and Strawberry Puffs.  (See previous post: Candy Bags)
  10. Sugar candies in pink and white (two different bowls)

I was exceptionally happy with the result -- most of my candy was gone, as were all of my business cards.  I addition to the candy, I also had pink depression glass candle holders and clear/gold taper candles.  There was a little fishbowl with pink marbles and flowers in the bottom and floating gold flowers, as well as a miniature tea set.


I also brought this flower display from home.  This is one of my favorite flower arrangements, inside my favorite vase, and I keep it in my parlor to enjoy year-round.  I thought it was absolutely ideal and grabbed it on the way out the door.


And finally, you can see my Party Banner in the background, and my Pretty Little Lace Runner under everything. 


Craving candy now??  : )

~ Sarah

June 23, 2011

Pretty Little Lace Runner (or) Ode to Lace

Hey there! 

I was recently given some unusual remnants... unusual, but extremely awesome... from the local Lace Factory, which closed many years ago!  They were given to me by one of my personal heroes, a wonderful lady who has decided to purge her craft supplies (she was my hero before she did this, mind you!)  She had boxes and boxes of lace in fabulous condition... fabric, ribbons, notions, trims.  Green lace, brown lace, pink lace, white.... daisies, flowers, checks, rare patterns.

It is the holy grail of lace. 

And it is now in my possession.  Mwahahaha!

Superman always takes it in a stride when I bring a new load of boxes into the house.  He knows that 2/3 of them will leave again before long.  I had to break the news to him (gently, of course) that the lace was moving in for good.  To make my point much more obvious, I opened the boxes and showed him my loot.  I'm not sure what I was expecting... perhaps I expected him to start drooling, or to at least have gold reflecting in his eyes... but furrowed eyebrows??  "So... these boxes are basically just a bunch of scraps?"  The next fifteen minutes were dedicated to my explaining, in detail, how wrong he was to call these rare treasures mere 'scraps'.  I told him that this was offensive, and that, in the future, he should show more respect when referring to my lace.  (Don't worry -- he's used to my strangeness, and to be fair, I've also been asked, in the past, to show more respect for his sawdust floor in the basement, and to refrain from bringing a vacuum near it ever again.)

So, today, I will be sharing with you my first project with my lace!  (And I do apologize for the quality of the pictures.)  From my treasure trove, I selected a light brown lace piece that had already been cut a little.  I trimmed off the edges so that it was square, then ironed the edge under (on low heat) about 1/2" all the way around.

Then, taking a long, pink ribbon, I wove it through the lace.  Now, there are easy ways of doing this, and there are hard ways.  I chose a hard way (but, in my defense, it sounded easy at the time).  I chose to thread the ribbon through already-existing holes in the lace.  Obviously, I was crazy.  It worked, but it was extremely time-consuming (approximately 2 hours).


On the very last corner, I tied a dainty little bow.


And that was it!  This is the only runner I will be making like this... I just don't have the time to make more.  But I will certainly be enjoying this one!

~ Sarah

June 21, 2011

Homemade Sugar Cubes

So, did anyone make a bench cushion last night?  No? 

Well, today I shall share something that I tried for the first time yesterday, and had ENORMOUS success with.  If you've read my recent blogs, then you will know that I have a large tea party coming up shortly, and I've been a busy little lady bringing all the many pieces of it together. 

For last year's tea, a friend of mine decorated sugar cubes which were a beautiful little addition.  This year, she is quite busy with a new job, so it became obvious that pieces she had done for me before would have to be taken into my own hands, sugar cubes included.  Obviously, it wouldn't be quite right to serve decorated sugar cubes one year, and plain ol' sugar the next. 

Google to the rescue!

I found a perfect sugar cube recipe: Rosewater Sugar Cubes, and decided that I could quite easily put this into action.

Supplies:
  1. Sugar
  2. Flavored water (such as Rosewater {which I found at a local organic store}, orange blossom extract, mint, etc)
  3. food coloring (optional)
  4. small cookie cutters (optional)
  5. cookie sheets
Begin by mixing your sugar with your flavored water.  I started with about a half-cup of sugar, to which I added the flavored water in small portions until it looked right.  You want the mixture to be something like wet sand (if it's too dry, it won't stick together, too wet, it will pack down into a soggy mess).  I also added food coloring to the mixture to help identify the flavor (pink for rosewater, green for mint, peach for orange blossom, and then some plain-flavored, lavender-colored.)

Your mixture should look like wet sand.

Next, pack your sugar into your cookie cutters (which is very much a hands-on project... it does not work half as well if you try to use a spoon.)  I found that filling my cookie cutters about half-way made the perfect size.  Gently press them out the bottom of the cookie cutter, and place them on a cookie sheet.


Now, I have found that most sugar cube directions say to merely let them dry, but I'm impatient, so I turned my oven onto a very low heat (150, I think) and let them sit in there until the outside of each cube was solid (something like 20 minutes).  The inside was still quite syrup-like, so I let them cool afterwards and they hardened quite nicely. 

You can see that they're still a little syrup-like, but
cooling at room temperature for 10 minutes hardens them.
My assistant and I agreed that the rosewater was lovely, the orange, charming, but the mint -- OH! the mint!  It tasted like wintergreen candy, and there is no font or emoticon that can interpret how wonderful it smelled... it was still lingering in the air when I woke up this morning!  {And I have no doubt that it would make a perfect small gift for another time!}

Rosewater cubes

So, here's a small sampler of the sugar cubes, once finished.  I'll admit, it's a lot of sugar per cube, even for someone like me, but that's alright -- they look so perfect on a plate together that we'll pretend they're the perfect size. 


And fyi - we already tested them.  They are delightful in a nice cup of tea!  :)

~ Sarah

June 15, 2011

Party Banner

Hey there! 

Today, I'll be sharing an idea that someone else shared first, and I have borrowed time and again.  : ) 

Context:  I am making a table for my party planning business at an event within the next couple of weeks, and intend to display a pink and gold candy bar.  Jessica at Such Pretty Things gave me an idea last year that I've used before (you can see her original idea here.)  I thought it would be ideal for my table display.

What you will need:
  1. Cardstock in various colors that match your theme
  2. Scissors (or rotary cutter)
  3. Ruler (or measuring mat)
  4. Ribbon
  5. Tape or glue
  6. Sewing machine
  7. Large hole punch (I used a 'cameo' shaped punch, but there are many different kinds out there.  I spotted a rectangle, an oval, and in the past, I've also used a round one).
  8. Letter stencils
I found a variety of delightful papers in my theme colors.  I particularly loved this pink paper with the daisy pattern.  So cute!  (I'm fairly certain these were all picked up at Michael's.)


I cut the triangles 5" long by 4" wide...

... and had a lot of fun taking pictures. ;)

For the lettering, I went with basic colors that would not clash.  (That was only my preference for this particular banner; I have used checks and polka dots for more colorful events.)


Using the double-sided tape or glue, affix your punch-outs to the triangles.


In my case, I needed 14 separate triangles (three, five and six). 

Next, pick your ribbon for the top.  I always have a large selection on hand, since I never know what will speak to me. 


Make sure you test different ribbon options.  In my case, several looked very lovely, but I finally settled on the wide, gold ribbon that was a tad gaudy (I selected it only because there was much more pink than gold in the banner already.)


Using your sewing machine, carefully stitch the ribbon onto the triangles.


Once you have it together, you can stencil on the letters!  (Actually, this step should be done much earlier in the process... arguably before you affix the punch-outs to allow for errors).  I prefer to do it last, but that's probably just me.


And there you have it!  An adorable little banner that you can use for many events.  I'll show you the matching candy bags for my table another day.  ; )


~ Sarah